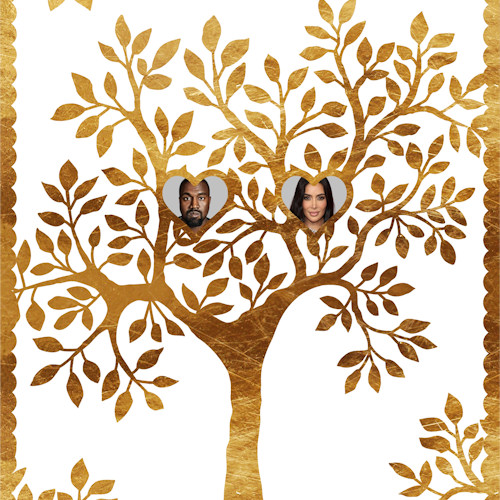
This business adds photos to a gold foil-looking tree template, prints it, and adds it to a frame to create a beautiful family tree photo frame.

This custom family photo frame can be sold for a good profit as a service, looks nice in any home, and is a great gift to give. It can be operated as a standalone business if you can produce volume, or it can be added to another business or as a side business. I personally can produce five frames per hour at an average profit of R100. Whether you can sign up for that many clients is a different story entirely.
General printing businesses can have razor-thin margins and be very competitive. This has pushed many people into the novelty printing business, such as sublimation, which has higher margins, less demand, increased competition, and also a couple thousand rand in startup costs. To keep my input costs low, I outsource my printing and use off-the-shelf frames from suppliers that are available in most malls.
And that is why this business opportunity has almost no startup cost. Why? Because the printing is outsourced to a walk in printers in malls such as PostNet, 3@1 etc. I also get my frames from Mr. Price Home in the same mall. The two are often located a few minutes apart in major malls and not far away from people who live in cities.
The economics are as follows:
Startup cost: $12 (around R230) for the template from a designer on Creative Market
Print costs
Around R15 A3 colour print
Around R5 extra for thicker glossy paper (they will print it on this instead of the standard 80gsm).
Total: R20
Frame costs
A cheap A3 "certificate" frame costs around R80. This one sells for R200 minimum. But this does not do this design justice.
My favourite is a "gallery" frame with mat board, which sells for around R240 (cheaper when on sale). This one sells for R350 minimum.
I also explain why I favour outsourcing over buying a colour printer and paper.
This is the design:

This is the laser print:
 (Colour variations will differ from screen to screen and printer to printer; see more below.)
What you’ll need
* A computer with design software (image editing and layout)
* Flash drive to take it to the printer.
That is it! You are in business.
I use CorelDRAW and PaintShopPro, but there are free alternatives available (Inkscape, Gimp).
Now people like to ask, “Can I design it on a phone or tablet?" The question to answer is: "Do you have a photo editor on your phone or tablet that you can use to crop, add shapes, and lay-out images in layers (above and below) that, when you merge and save the image, it will save without compressing or much loss in quality or size?" That is essentially what is required; the images have to be cropped and maneuvered below the template. I don’t know, as I only use computers for my design work, and as said before, I can do five of these in an hour easily. I cannot provide any input with regards to how fast you can work on a mobile or tablet.
I also use grids and guides to line the image relative to the hearts. It will almost never be perfect unless the images are taken from the same perspective, but so long as they do not look skewed,

With CorelDRAW, there are two approaches you can take to add the photos to the frame:
PowerClip: Draw a heart and then use PowerClip to add an image to the heart-shaped background. Position the template over this:

My way: I crop my images into a square, then I add my template over the image to block out the rest of the image. I work faster like this, as I am able to adjust the nodes if any of the images are sticking out:

I also use heart shapes filled in with a neutral background (20% black in this case), which I stack below the frame template and below the image. See the steps below.
You can operate this business almost anywhere where there are malls. I’ve never had my PostNet run out of ink or paper. And if Mr. Price Home always has stock when I go. That's it. I strictly walk in mainstream shops in and out in a few minutes.
If you don’t want to outsource, you can obviously use your own printer and buy coated paper. But as someone who has worked in printing for many years, I prefer to outsource it. Even if you have a colour laser that gives you the sharpest image, it costs a hell of a lot of money to replace the toner. When I outsource, there are no worries about having to put away a certain amount of money every time for toner. The air is clean. Pure profit. That is my personal preference, influenced by the fact that I have three PostNets within five kilometres of my house.
So your mileage may vary, which may influence your decision. I just don’t feel like spending on and maintaining expensive printers anymore. Same for the papers. I have to go to a B2B supplier (NOR, Peters Papers, Antalis, etc.). One has a minimum order quantity, the other has a minimum order value. I have to call in the order, drive far away, and then I have money lying there waiting for new orders. Nope. I walk into the shop and print on demand as needed.
The transparent templates have to be licensed for $12 from the designer to use the template for commercial purposes and come in the following configurations:

Click here to purchase high-resolution templates. The templates will arrive as 11 transparent PNG files in a zip folder around 95MB in size.
Step 0:
Show a client sample. Get a deposit from the client before commencing any work. If you are happy with potentially wasting your time, you can do this at Step 4.
Step 1:
Receive or convert (scan) the photos into digital format. In the past, I used to convert all images to grayscale to create a uniform look. Now I would like to remove the picture backgrounds and add a neutral background. Whatever floats your boat.
To remove background you can use remove.bg
Before

After

Step 2:
Crop out all unnecessary parts to create a nice square you can shimmy either into a heart shape using PowerClip or hide using a handmade template like I do.
Step 3:
Add the frame to the workspace. Above everything else (aka “bring to the front"). This will allow you to “cover” parts of the images not cropped by using PowerClip or hand-drawn shapes like I did. If there are still edges sticking out, then you need to cover them. With my template, I can just manipulate the nodes.
Step 4:
Once you are happy, get approval from the client for the design. Make sure to not send them the high-resolution version without a watermark; otherwise, they can steal it and print it themselves. Another reason why you should take a deposit beforehand.
Step 5:
Once the client signs off, Take it to printer. The first time I went there, I just said, “Print me that on your thicker glossy paper," or something like that, and they showed me the two options: they had a 170gsm and 250gsm. And that cost a few rands extra on top of the colour print price (currently R5 at PostNet). I ask for the 250gsm paper. I used to be very meticulous about my papers. I don’t really care in this case; just give me thicker, glossy paper. It is going inside a frame, and I just want a thicker paper than normal office bond.
Tip: Different print settings, different results
You need to remember that we are not dealing with Pantone colours here; what I see on my screen and what you see on your screen will look different. The same is true for printers; different printers will print different shades of colour. Hell, the same printer will print different shades if you use different settings (photo vs. graphic, reduce or increase the brightness, for example, or even adjust print quality to use less ink, which will look different). You need consistency, because some clients are very finicky. If you show them one thing, they expect that. You need to communicate this; let them tell you what settings they are using and even if they have more than one printer.
Let me show you an example. This is from two different printers. But the same machine can produce something similar using different settings:

Which of the two is closer to what you see on screen? OK, the other one you did not pick—does it look better or worse than the one closest to the screen colour? The lighter one looks closer, but the darker one is more vivid, for example. Which is better? Ask two people and get two different answers. I asked one person and got two different answers. Now we are bikeshedding. Don't bikeshed. Ask them to adjust the brightness to your liking and stick with it. Print one if you don't like it; ask them to adjust and print another; do the same for another if you have to until you are happy; tell them to write the machine and the setting on and see what you like; and the next time, tell them to use that same setting as you want consistency for your clients.
Step 6:
You will need an A3 frame, which is widely available off the shelf. Mr. Price Home has become my go-to place. Last time, I got a further discount on an already discounted frame (look for those Mr. Price red stickers). Leave the backing paper the frame comes with in and apply some Pritt adhesive to the back of the print; otherwise, it will shift in the frame.

The print will shift if it is not glued down.
And you are done!
Sourcing
Design: Gold Foil Family Tree Bundle by Tommy & Tilly Design
Print: 3@1, PostNet
Frame: Mr. Price Home, Pep Home, @Home etc.
Selling
Family tree designs are popular on handcraft platforms such as Etsy. I have seen a lot of editable ones where you can add all the people's names; I prefer the photo one. Yes, it takes more work to add and crop photos than to edit a text field. This will look nice in everyone's home; blanket the whole neighbourhood. You can charge people with more children more money. You can go as high as 12. Steve Hofymeyr, for example, has six children with five different women; you can add him, baby mommas, and the kids. Elon Musk, on the other hand, has 11 children, so you can't add the mothers in his case. No frame is available for Jacob Zuma unless you split it over two frames, etc. Remember, it is double the work to add 12 than it is to add six members of a family. You can even add pets as well.
Selling digital only
Another option is to sell the digital-only file once you have added the photos. People send you their photos; you add them to the template, and you mail them back to them. I am able to work fast and can design a frame in 10 minutes.
Variations
I made one for a friend of her mother and father. I printed on gold metal in an A5-size frame. You can do this with wax paper and a clothes iron. It has a nice, unique look. Or you can print on different coloured paper or textured paper for a more weathered look.